Illuminate Your Creativity: How to Build Your Own Custom Luminaire with Lampadabra’s Lego-Inspired Bricks
Introduction
Have you ever imagined designing your own custom lighting fixtures, transforming your room with a personal touch that reflects your creativity? Creating a unique luminaire isn’t just a trend; it’s an engaging and fulfilling project that lets you personalize your space with light. With the advent of modular, Lego-inspired building bricks, you can now make your own lighting masterpieces, blending function with design in a seamless, enjoyable process. Crafting a luminaire from scratch is no longer limited to professional designers – you, too, can bring your vision to light with minimal tools and plenty of imagination.
This guide will walk you through the process of creating your own custom luminaire using easy-to-use, interlocking building bricks. From choosing a style to final assembly and lighting, every step offers a blend of fun and challenge, ideal for design enthusiasts and beginners alike. Ready to embark on a DIY adventure? Let’s dive in!
The Appeal of Building Your Own Luminaire
Customizing lighting gives you the freedom to break away from generic fixtures and add something truly unique to your home. But it’s not just about aesthetics; custom luminaires are all about flexibility, letting you play with materials, shapes, and light placement to create the ambiance you desire. The building blocks used for these fixtures are specifically crafted to interlock in a way that’s both sturdy and adjustable, giving you creative control over every aspect of the design.
Not only is the process budget-friendly, but it also nurtures creativity, making it a perfect hobby or project for families, kids, and adults alike. This hands-on experience is all about having fun while experimenting with different shapes, colors, and patterns until you find the ideal configuration that lights up your space just right.
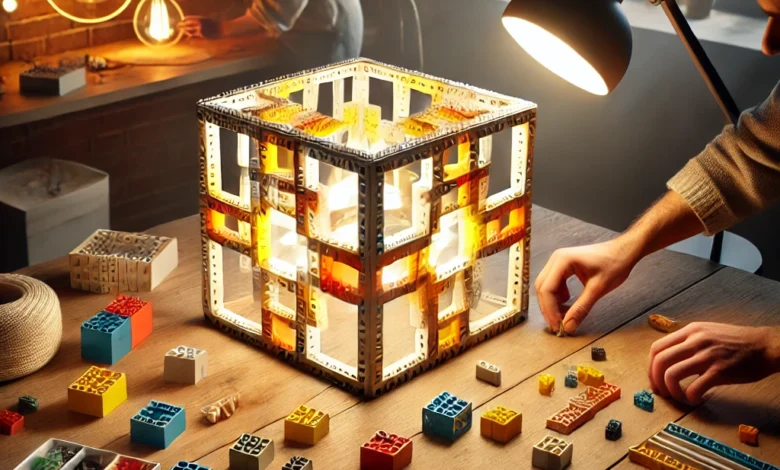
Choosing Your Luminaire Style and Shape
To begin, think about the type of lighting you want for your space. Luminaires come in many shapes and forms, each offering a different kind of illumination and vibe. Are you going for a minimalist pendant light for the dining area, a cozy table lamp for the bedroom, or an avant-garde floor lamp that serves as a centerpiece? Decide on the scale, shape, and function that suits your room.
For example, a geometric luminaire shape is ideal for adding a modern and sleek touch to any room, while round or softly curved designs often create a cozy, relaxed atmosphere. As you choose a style, consider how it will interact with other elements in your room, such as furniture, wall colors, and decor. Once you’ve chosen a direction, gather your materials and prepare to assemble your luminaire with bricks that reflect your chosen design.
Gathering Your Materials and Tools
A great part of the DIY luminaire-making process is how few tools and materials are actually needed. Here’s a list to get you started:
- Building Bricks: Modular bricks come in different colors, shapes, and sizes, allowing for endless creativity. Choose colors that match or contrast well with your room’s theme.
- Light Source and Holder: Opt for LED bulbs, as they’re energy-efficient and come in various color temperatures, which influence the ambiance of your space.
- Connecting Wires and Plug: Make sure your setup is safe, especially if using a power source.
- Socket and Switch: Easy to assemble and allows you to turn your luminaire on and off as needed.
- Tools for Assembling: Basic tools such as a screwdriver, wire cutters, and a wrench are often sufficient.
Once all materials are ready, set up a comfortable workspace with ample room for experimenting with different designs. A clean, flat surface and good lighting are essential to ensure you can see your design and connect each piece carefully.
To start building your own custom luminaire with Lampadabra’s Lego-inspired bricks, visit https://orcham.com/en/lampadabra/ and explore the endless possibilities for creative lighting design.
Step-by-Step Guide to Assembling Your Custom Luminaire
Step 1: Start with the Base
The base of your luminaire provides stability, so it’s essential to create a solid foundation. Depending on your design, choose large, heavy bricks for a stable start. Arrange them in a pattern or shape that’s visually pleasing yet balanced. If you’re creating a table lamp, for instance, a square or circular base often works best, while a pendant light may not need a base at all.
Step 2: Building the Frame
Next, start layering bricks upward to build the frame. Here’s where you can let your creativity flow by arranging bricks in a specific pattern, such as staggered layers, spirals, or an interlocking mosaic. Adjust each layer slightly if you want to give the fixture an interesting texture or asymmetrical look.
For larger luminaires, you might need to reinforce the structure with additional bricks, especially around the middle section, to prevent any accidental collapse.
Step 3: Adding the Light Source
This is where the luminaire takes shape. Place your LED bulb into the light holder, and position it in the center of your frame. Ensure that your bulb and socket are securely fitted, as you don’t want the light source to be loose. Use the connecting wires and switch to create a circuit, then test the connection to make sure everything lights up as planned.
Step 4: Experimenting with Light Diffusion
One of the most rewarding aspects of a custom luminaire is the ability to play with light diffusion. Depending on how closely you arrange the bricks, you can create different lighting effects – some setups may let light seep through small gaps, creating a softer glow, while others might direct light through specific areas for a spotlight effect. Take your time experimenting with light diffusion until you achieve the desired ambiance.
Step 5: Final Touches and Adjustments
Once your luminaire is assembled, make any necessary tweaks to enhance its stability and appearance. This might involve adding a few extra bricks for aesthetic balance or adjusting the bulb to improve light focus. When you’re satisfied, give your luminaire one last check, ensuring all pieces are secure and that the fixture operates safely.
Creative Ideas to Enhance Your Luminaire Design
Creating a luminaire from scratch means no two fixtures are exactly the same, giving you countless options to personalize. Here are some inspiring ideas to take your luminaire design to the next level:
- Thematic Colors: Use colors that suit your room’s theme or seasonal colors for a festive look.
- Modular Patterns: Try different interlocking patterns like grids, chevrons, or waves.
- Layered Designs: Add depth by stacking bricks in layers or creating multi-level sections.
- Custom Shapes: Break away from traditional shapes by crafting a luminaire that mimics nature, like a flower or tree.
Safety Tips for DIY Lighting Projects
Working with electrical components always requires caution. Here are some essential safety tips:
- Use Insulated Tools when working with wires or connecting the socket.
- Choose Quality Components, especially for electrical parts, to ensure durability.
- Test the Fixture Carefully, making sure the wiring is secure and there are no exposed wires.
- Avoid Overheating by choosing LED bulbs, as they emit less heat and are safer for enclosed designs.
- Keep Children Safe by supervising their involvement, especially when connecting the light source.
Benefits of Creating Your Own Luminaire
Why go the DIY route instead of purchasing a pre-made luminaire? There are a few compelling benefits:
- Cost-Effectiveness: Creating your own luminaire can be significantly more affordable than buying a designer fixture.
- Eco-Friendly Choice: By using modular bricks and energy-efficient bulbs, you reduce waste and power consumption.
- Skill Development: Building a custom luminaire hones your crafting and design skills.
- Emotional Satisfaction: Every time you switch on your luminaire, you’ll feel a sense of pride in your creation.
Conclusion
Building a custom luminaire from modular bricks is a rewarding, creative adventure that anyone can enjoy. From selecting the shape and style to seeing your fixture come to life, every step adds a personal touch to your living space. This DIY approach not only lets you tailor your lighting to your room’s specific needs but also brings a sense of accomplishment and joy, transforming a simple lighting project into an engaging art form.
Whether you’re looking for a weekend project, a way to involve the whole family in something hands-on, or simply a unique way to express yourself, assembling your luminaire with bricks offers endless possibilities. So, go ahead and let your creativity shine as brightly as your new custom creation!